Recalibration Tool for DualShock 4 & DualSense Controllers
Since the beginning we have had a special place in our hearts for DIY and at-home solutions, so we like to spread the news whenever there is a tried and true solution to one of the many problems we all face. We have been using this program extensively in the office, ensuring its ability to recalibrate the DualShock 4 and DualSense controllers, and now we would like to promote its use far and wide.
Before following this guide, please see our article on understanding what thumbstick drift is and how it can influence in-game settings:
Did you read it? Thanks.
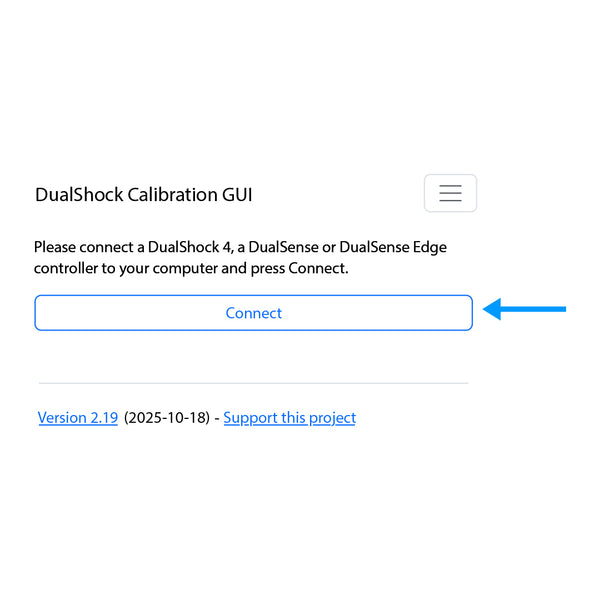
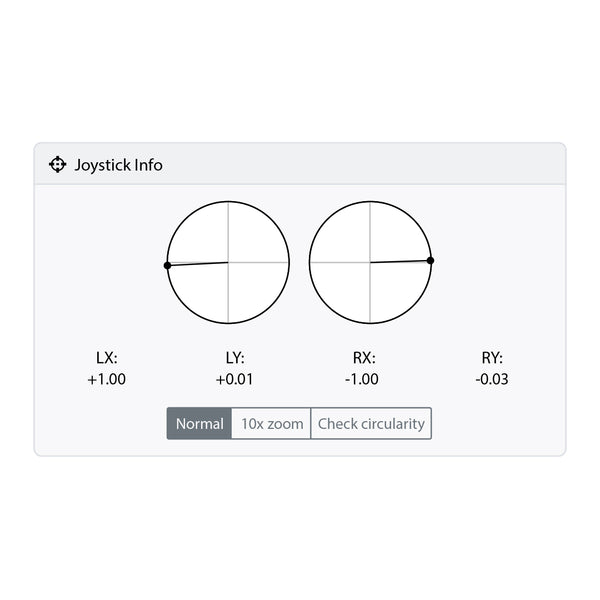
This program samples where your thumbsticks sit naturally and then overwrites those default X and Y values to a better, more centered position. Even on an unmodified controller, the manufacturer’s calibration won’t last forever. Thumbstick mechanisms naturally change over time with use, so every controller may require recalibration at some point.
DISCLAIMERS
This is not guaranteed to fix stick drift. If your controller's thumbstick mechanisms are too old or too worn down, you most likely should have them replaced instead of using this tool. This tool can only move values to a better position; it cannot bring a physically broken mech back from the dead.
Battle Beaver is not responsible for any damage or unintended outcomes to modifying your controller with this tool. If you absolutely must recalibrate your Magneto Mech controller once you receive it, please keep in mind that you may experience input errors and that you may have to adjust in-game settings to compensate.
If your controller is under warranty with us, altering the calibration settings of the controller may void your warranty. Please contact us before using this tool:
https://battlebeavercustoms.com/pages/warranty
Please read all of the instructions before and during the recalibration process.


Frequently Asked Questions
When should I use this tool?
When should I use this tool?
- When your controller is new or relatively new but exhibiting stick drift.
- When you are experiencing stick drift at or below default deadzone settings in-game.
- If your Battle Beaver controller is experiencing stick drift above default deadzone settings using this calibration tool may fix the issue, but it may also require a physical mech replacement in the event that the drift is occurring due to a physical defect or damage. You can have that done using our Service Center.
Can I use this with a non-Battle Beaver controller?
Can I use this with a non-Battle Beaver controller?
You can certainly try! However, we have only verified this tool with OEM controllers and our controllers, which are modified OEM controllers.
We cannot verify it will work with other companies' modified controllers or 3rd party PS4/5 controllers. If you are using this tool with controllers other than OEM or Battle Beaver controller do so at your own risk.
As of 9/20/2024, this tool works on all OFFICIAL PS4 Dualshock and PS5 Dualsense models. It does not work on the Xbox controllers, or any 3rd Party / Non-OEM controllers (think Fly Digi or 8Bitdo).
Can I use this for Xbox controllers?
Can I use this for Xbox controllers?
No. Currently this tool is only usable for PS4 and PS5 controllers.
For Xbox recalibration, please click here.
Will non-PS4/5 controllers be supported in the future?
Will non-PS4/5 controllers be supported in the future?
The developer is working on adding the support of the following controllers in the future, so stay tuned!
Is this tool developed by or professionally associated with Battle Beaver?
Is this tool developed by or professionally associated with Battle Beaver?
No. But we really like it and if you also really like it, then we encourage you to support its creator here.
DualSense Edge Module Not Saving Fix
DualSense Edge Module Not Saving Fix
If you previously flashed a DSE module but the values are not saving properly, then read this:
https://battlebeavercustoms.com/pages/dualsense-edge-module-not-saving-fix