
Project Marius Setup & Calibration Guide: Part 2
Welcome to Part 2 of the Project Marius Setup & Calibration Guide! With initial setup out of the way, the next step is to fine-tune the controller so it feels exactly the way you want.
On this page, we’ll cover:
- Circularity
- Circularity Error Rate
- Advanced thumbstick calibration methods
Haven’t done the initial setup yet, or still need help understanding all the options? Start with Part 1: https://battlebeavercustoms.com/pages/marius-calibration-instructions


Six random OEM controllers pulled off the rack and tested for Circularity without adjustment.
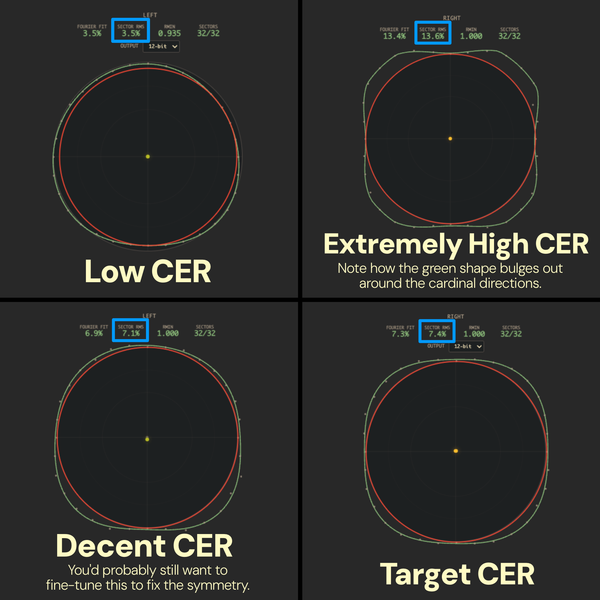
If the thumbstick range is too square, on the other hand (extremely high CER), it can potentially have a minor impact on the consistency between cardinal directions and diagonal directions. Note, though, that many older games actually expect a square input field, and some players actively seek it out. (It’s common for certain styles of Rocket League play, for example.)
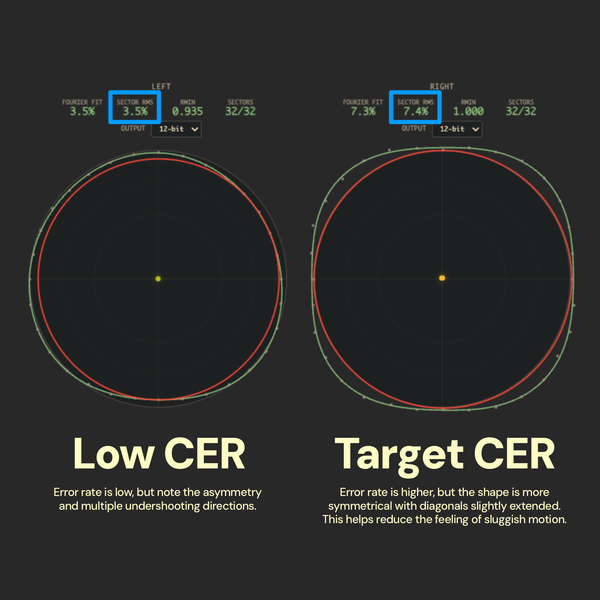
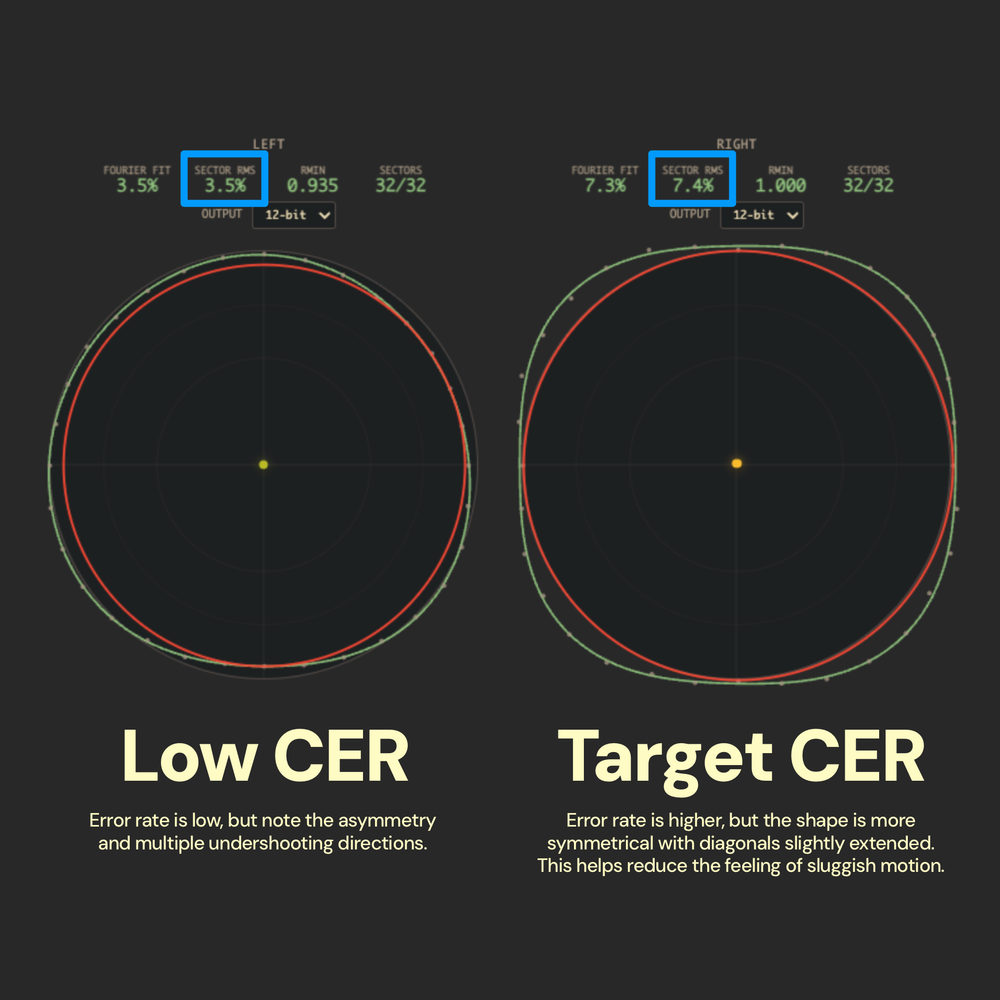
When Battle Beaver ships Project Marius controllers, we target a Circularity Error Rate around 6% to 9%, with each diagonal slightly extending past a perfect circle. If your controller fits that profile, it should feel normal. If it’s much lower or much higher than that, or especially if one or more corners undershoots the boundary, continue to the next guide for help adjusting it.
Note:
In real-world testing, we’ve noticed little practical difference from 4% up to 13%, though sensitivity to this will obviously vary person-to-person. Like we said at the beginning, every set of sticks will feel different to every set of thumbs.

Six random OEM controllers pulled off the rack and tested for Circularity without adjustment.
Adjusting Circularity Error Rate
At Battle Beaver, we call 0% - sub-5% Low CER, and anything higher than 10% High CER. Adjusting your CER changes based on whether it’s low or high CER. However, CER is not a particularly consistent or scientific measurement, and you should always try your controller ingame first, before starting any lengthy adjustment processes.
If you do dislike how it feels, return to the Circularity Tester to complete a fresh test. With that done, click the ADVANCED button and choose between the Adjusting Low CER or Adjusting High CER instructions below.


Recalibrate First
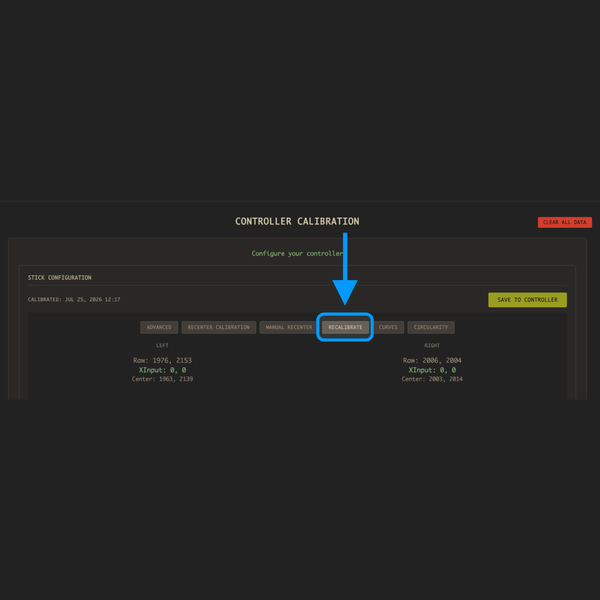
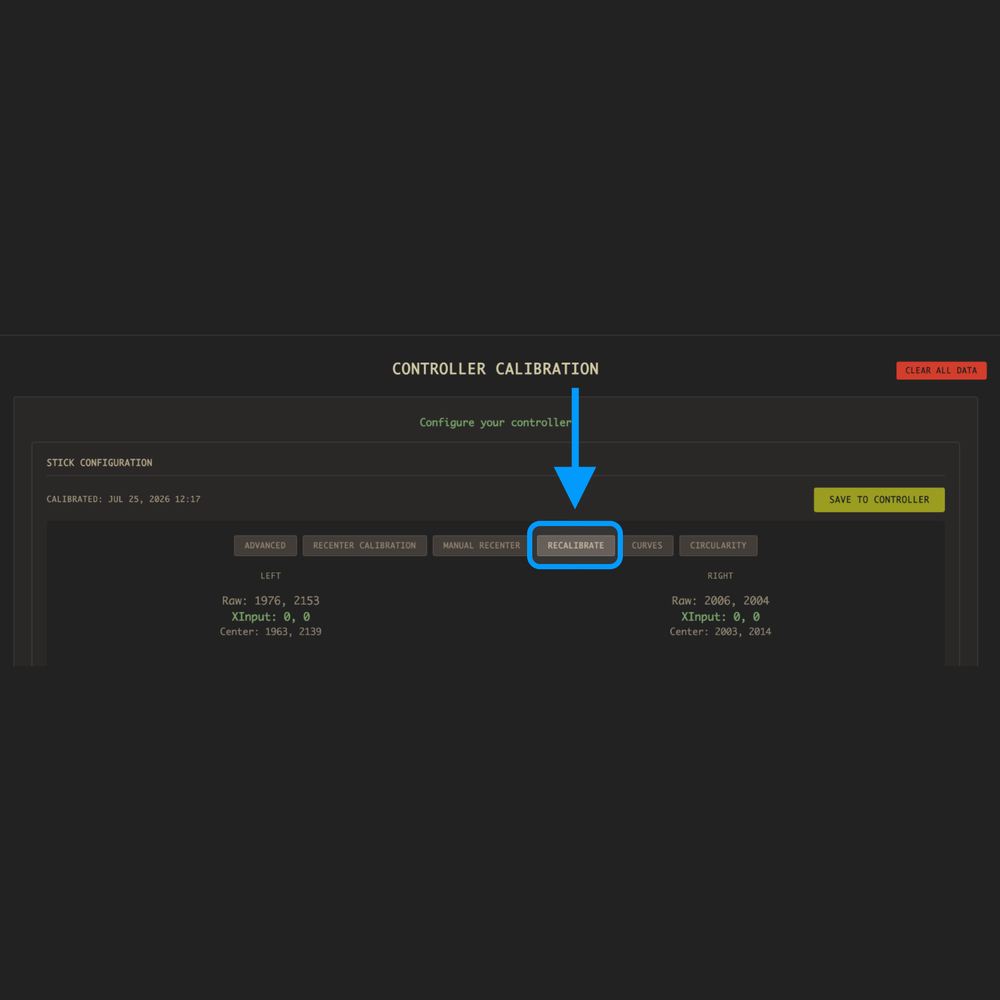
When you notice an issue, always start by recalibrating first, making sure to follow the instructions precisely.
As annoying as it is, this is often enough to help.
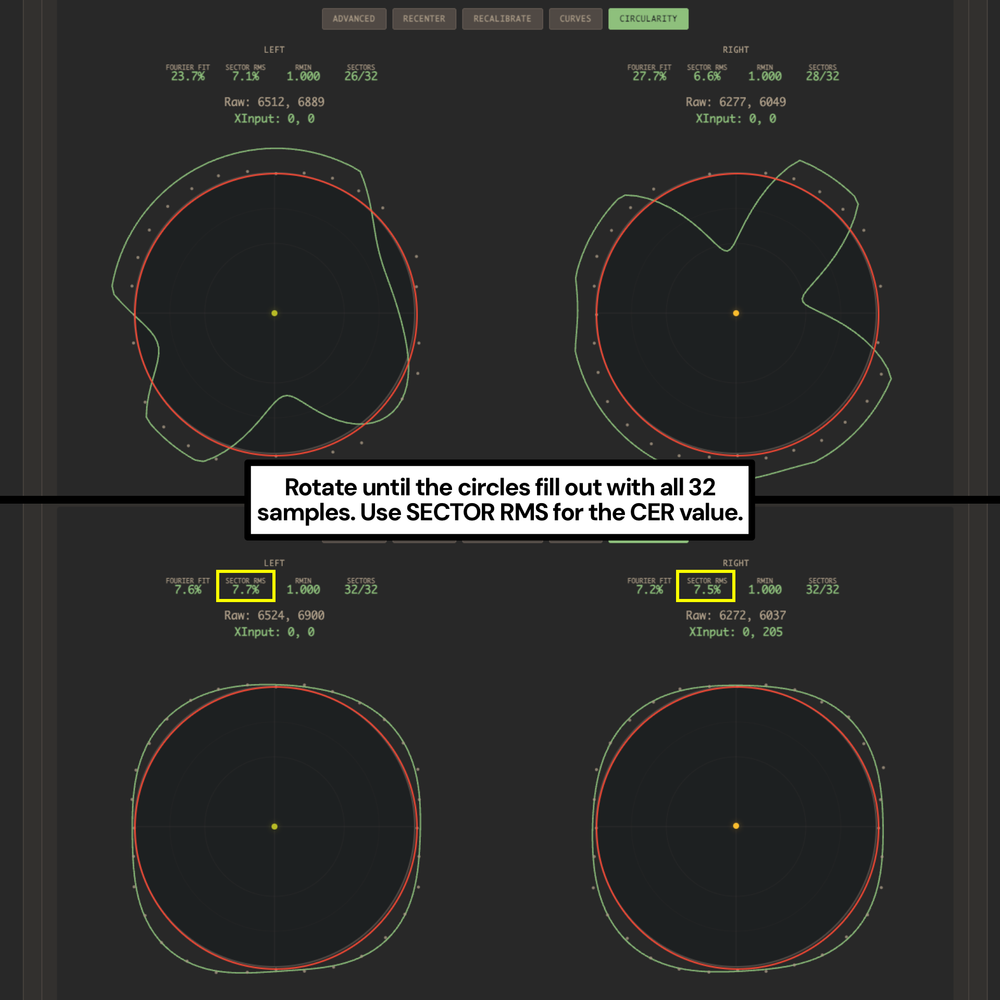
Complete a Fresh Circularity Test
After recalibrating, return to the main setup page. In the STICK CONFIGURATION section, click CIRCULARITY to activate the Circularity Tester and complete a fresh Circularity test. If recalibration fixed it — great! If not, continue to the next slide.

Check for Common Issues
If any of the following issues are present, make a note of them and continue to the next section:
- One or more cardinal directions (up, down, left, right) can’t naturally hit the edge of the circle without extra force.
- One or more cardinal directions hits the edge of the circle earlier or much more easily than it should (especially if the thumbstick isn’t against the wall of the thumbstick hole).
- The two cardinal directions surrounding an undershooting diagonal barely hit the edge of the circle, or require pressure to do so.
- One or more diagonal directions may reach the circle, but don’t extend past it. (Often, the source of this is cardinal directions falling short.)
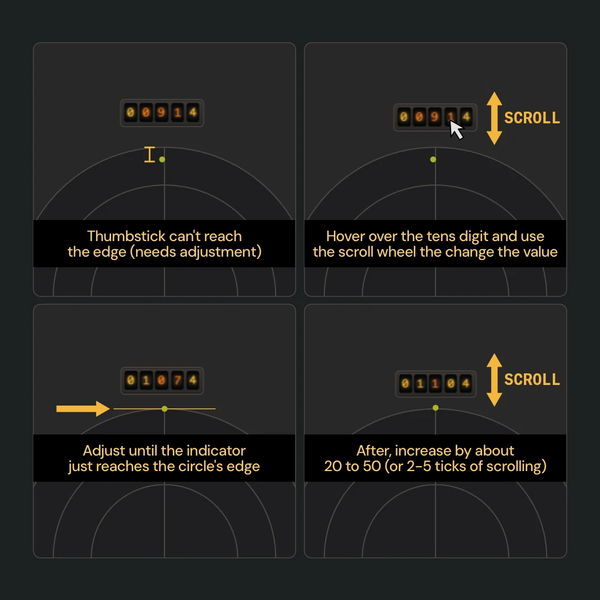
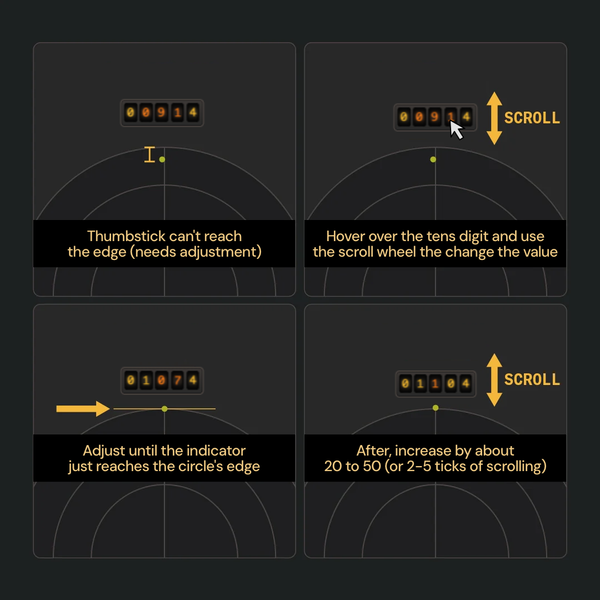
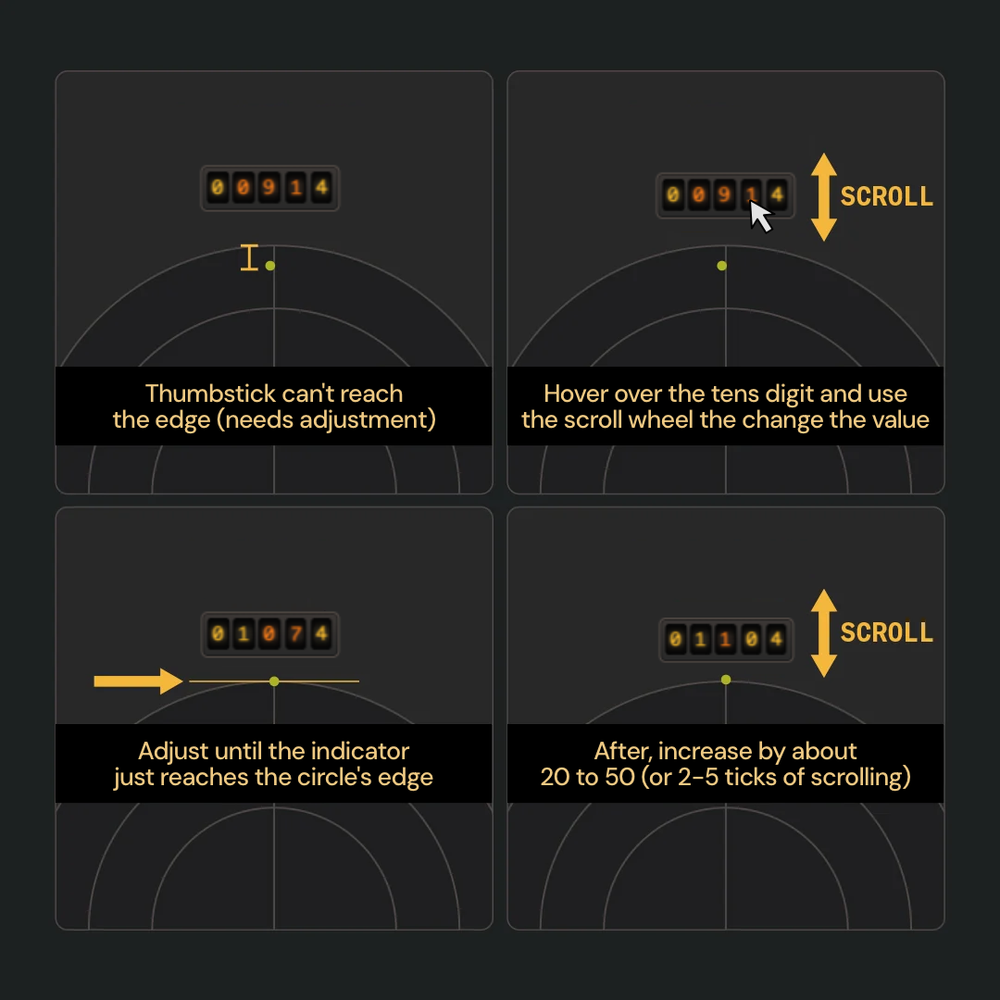
Adjust the Cardinal Directions ( 1 / 3 )
Step 1: Hold (and continue holding) the thumbstick in the problematic cardinal direction.
Step 2: Hover your mouse cursor over the tens digit (second from the right) in that direction’s input box.
Step 3: While hovering and continuing to hold the thumbstick, use the scroll wheel to adjust the value. This will move the thumbstick indicator in or out based on your adjustment. Continue until the indicator reaches the edge of the circle.
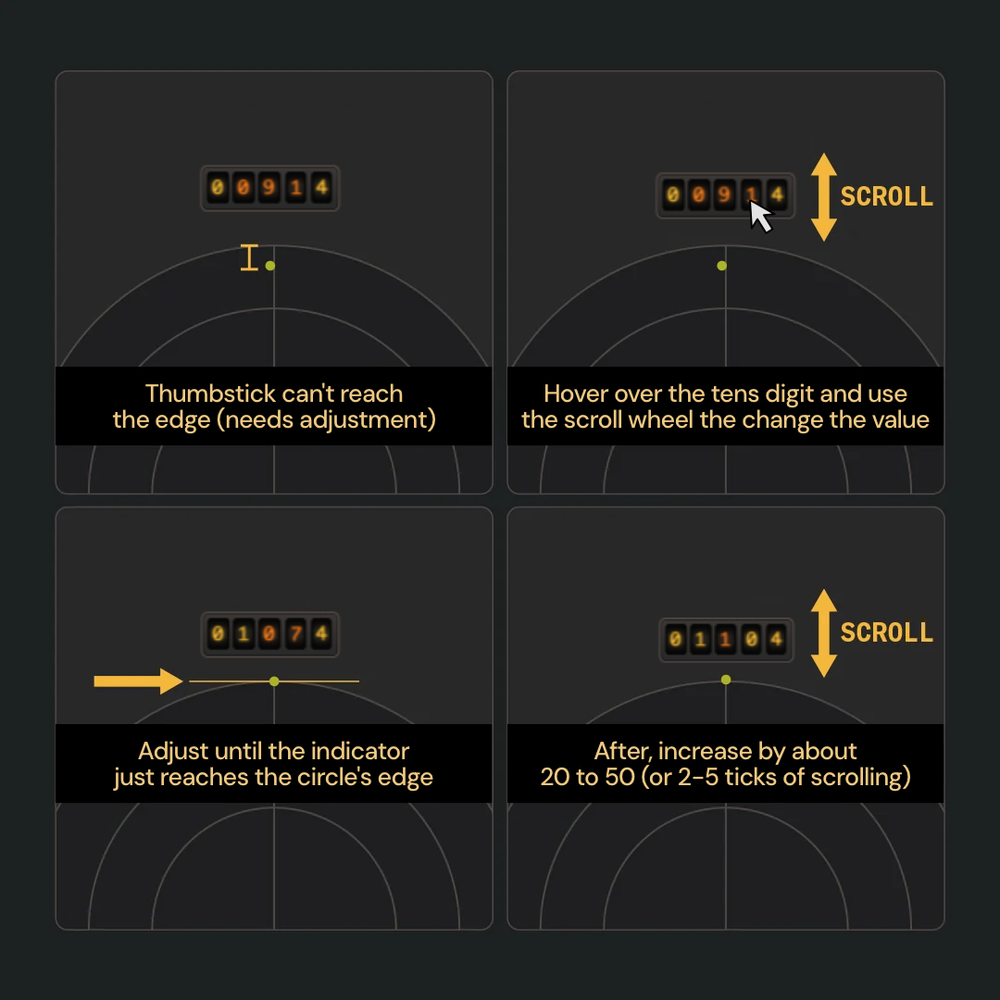
Adjust the Cardinal Directions ( 2 / 3 )
Our advice: Adjust the value gradually until the moment the indicator hits the edge of the circle. After that, continue adjusting for a few more ticks (+/- 20 to 50) to finish. The GUI won’t allow the indicator to move past the circle for a cardinal direction, so it’s easy to accidentally move it too far out. Following this gradual process will avoid that issue.
Note: Adjusting each cardinal direction will also modify the Circularity test shape and numerical result. You can use this to preview the impact of your adjustments. If the corners bulge outwards dramatically, you went too far.
Adjust the Cardinal Directions ( 3 / 3 )
After manually adjusting the cardinal directions, click the CIRCULARITY button twice to start a fresh Circularity test, then complete it. Hopefully, this was enough to move the CER into the recommended range and solve any undershooting.
If the Circularity Error Rate stays too low, or if you still feel issues in-game, continue to the next section for information on manual calibration.
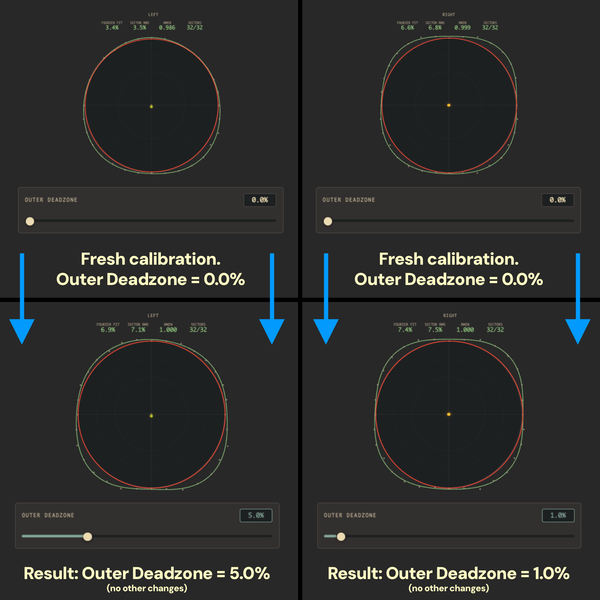

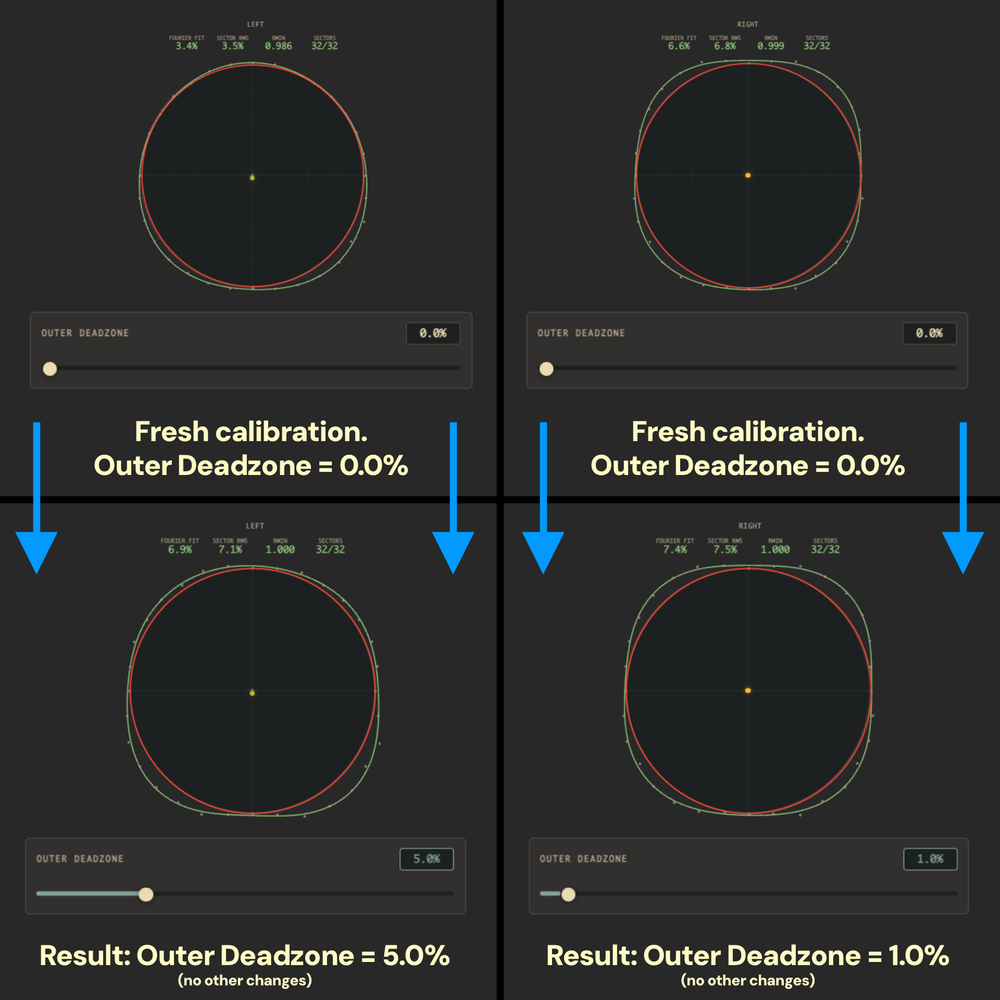
Option 1: Raise the Outer Deadzone (Difficulty: Simple)
Either keep the current Circularity test active or complete a fresh one. Raise the Outer Deadzone by 0.5-1% at a time, up to a recommended maximum of 5%. The Circularity test will show a live preview of how the Outer Deadzone affects the CER. Adjust gradually until it matches the shape and CER % you want.
This option is easy and doesn’t have many ways to mess it up. However, the larger the Outer Deadzone gets, the less physical space you have available before the thumbstick hits a maximum value. Some players dislike this feeling.
Try it out — if it fixes the issue and you don’t notice anything off, this is the quickest method.
Note: This setting may stack with in-game settings or hardcoded outer deadzones programmed by the developers.

Option 2: Manual Calibration Adjustment (Difficulty: Advanced)
Manually adjust the cardinal directions to change how the diagonals behave. For example, moving Up further out will also move the top-left and top-right diagonal directions.
This option requires trial-and-error experimentation. Each cardinal direction adjustment will impact both nearby diagonals (and each diagonal is impacted by both surrounding cardinal directions), so fixing one area can hurt another. Finding a good balance is challenging, and often leads to chasing adjustments around the circle.
Only try this option if you’re willing to dig in and experiment. If anything goes wrong, you can always start over by recalibrating.
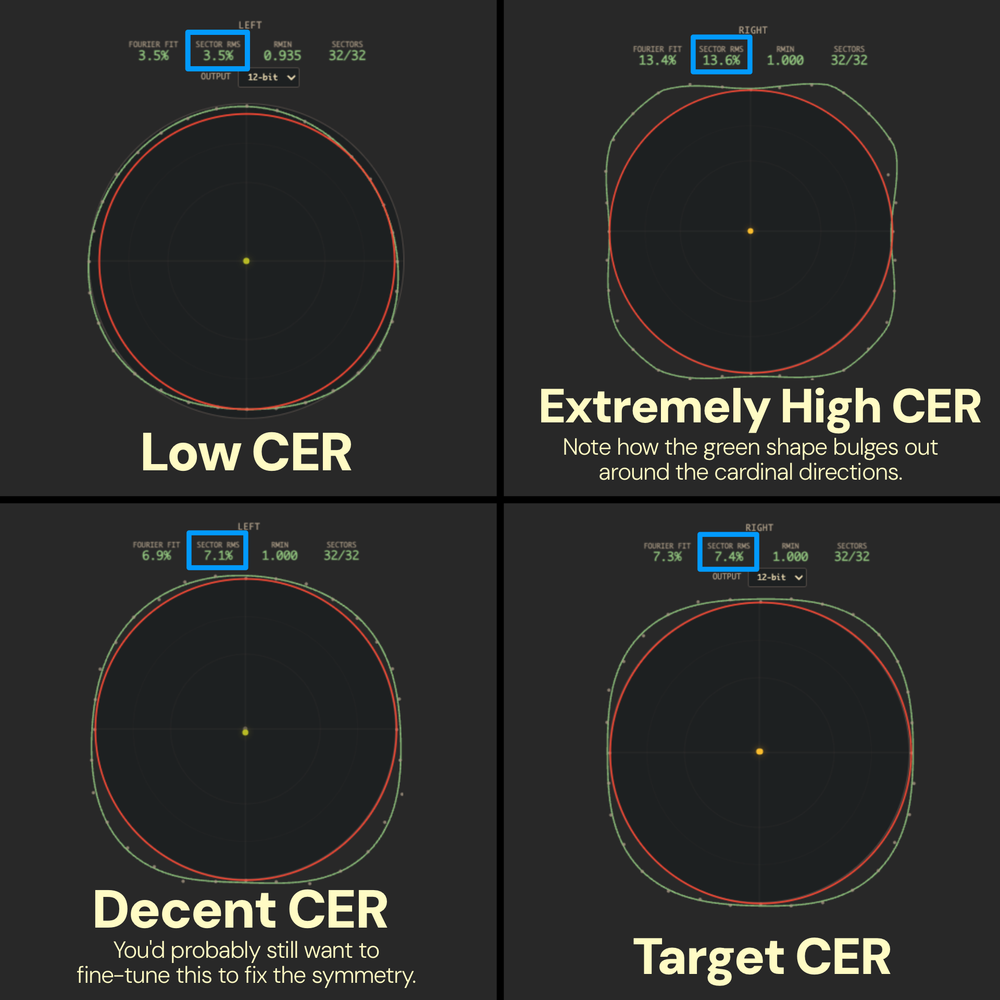
Good and Bad Examples
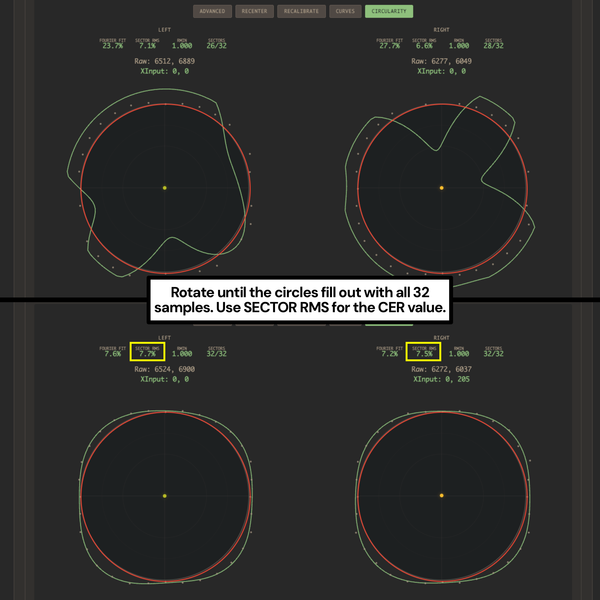
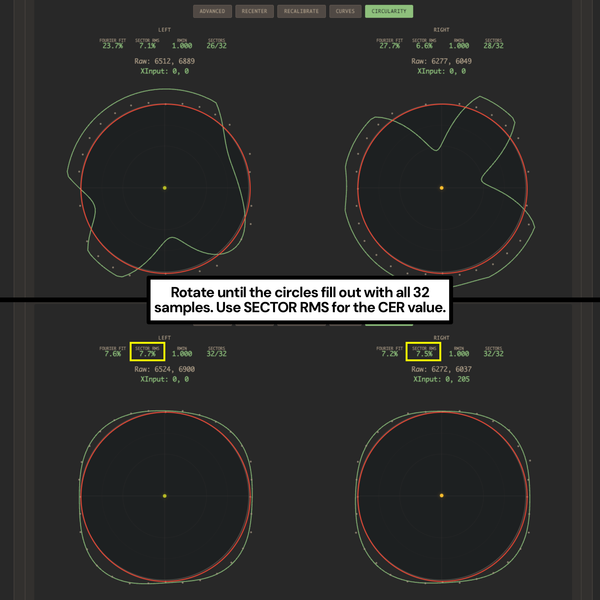
This image has a sample of good and bad Circularity results. Whichever manual fix method you choose, try to match the shape of the Good results.
We consider this to be the best default experience for most people.

Each of these Circularity Test results came from the same controller with the same calibration on the same thumbstick. All that changed was the way the test was performed.

Each of these Circularity Test results came from the same controller with the same calibration on the same thumbstick. All that changed was the way the test was performed.
Final Note
In the end, the numbers don’t always reflect the feeling. Chasing perfection on something like Circularity Error Rate before even trying the controller in-game is a common pitfall that prevents people from simply enjoying their new controller. Sometimes, all you need is a few minutes for your brain to adjust to the new equipment.
So before spending a ton of time making minor calibration adjustments, we strongly recommend loading up a game you’ve played a lot. Give yourself a chance to adjust and see how it feels in the context of a full match.
If you still aren’t satisfied, and you’re still struggling with dialing in your thumbstick configuration even after trying everything on the page, go ahead and contact Battle Beaver Customer Support. We’ll try to help you out.
And if you’d rather talk to other gamers and enthusiasts who are deep into calibration experimentation, Marius has his own Discord community filled with them. They’ll be happy to give you advice.
Join them here: https://discord.com/invite/QcCkfbkp3S
Troubleshooting
My LED is flashing green and I can't set up the controller
My LED is flashing green and I can't set up the controller
Update the controller's firmware by visiting https://update.mariusheier.com and
following the on-screen instructions.
Support
Frequently Asked Questions
Why order the JDM-5X from Battle Beaver instead of Marius?
Why order the JDM-5X from Battle Beaver instead of Marius?
The benefit of purchasing a JDM-5X board from Battle Beaver means receiving a ready-to-play controller.
We remove all of the required equipment and technical soldering experience to make use of the parts you'd get from Marius, and offer our own patented and signature modifications that professional and casual players enjoy to build a uniquely competitive PC-Only controller.
Setup Configuration & Update Links
Setup Configuration & Update Links
To setup, recalibrate, remap, and more:
https://setup.mariusheier.com/
For update notifications please use Marius' Official Channels:
Firmware Updates: https://update.mariusheier.com/
How does it connect?
How does it connect?
The board requires a wired connection to a Rear I/O port with a USB-C to A cable. Connections to a case USB port or a USB hub are incompatible.
What can this board NOT do?
What can this board NOT do?
As this is a custom board, it is important to note that controllers built with this WILL NOT HAVE the following:
- Console connectivity
- Bluetooth connection
- Macros / Keybinding
- Rumble / Vibration
- Touchpad Tracking
- Battery
What are MIDAS Mechs (HE)?
What are MIDAS Mechs (HE)?
MIDAS Mechs (HE) are the custom 5 pin Hall Effect thumbstick for the PS4 JDM-5X by Marius Heier.
MIDAS stands for Magnetic Integrated Digital Array Sensors, and are only compatible with the PS4 JDM-5X board. Unfortunately the 5 pin connectors are not compatible with 1st Party boards from Sony or Microsoft.
These unique Hall Effect thumbsticks overcome the issue you see in traditional 3 pin HE sticks other 3rd party controllers have by utilizing a fully circular magnet sensor for wider signal coverage, and an additional 2 pins of signal transference for improved accuracy and stability.
Why isn't Battle Beaver using the same Ginful Thumbstick mechanisms as Marius?
Why isn't Battle Beaver using the same Ginful Thumbstick mechanisms as Marius?
All of our modifications were built and developed on the ALPS platform, but after testing the Ginful stick boxes we believe that they have a significant enough difference in the return-to-center feeling that we decided to stick with what we know.
What is a JDM-5X board? What are the best use cases for a controller with a JDM-5X board?
What is a JDM-5X board? What are the best use cases for a controller with a JDM-5X board?
The JDM-5X board is a custom PC only controller board developed by Marius Heier, matching the form factor of a PlayStation 4 board. It's one of the fastest boards available on the market: GPDL testing shows a button latency of 1.43ms at 8KHz, which is faster than an overclocked 8KHz DualSense controller (2.11ms) and is roughly twice as fast as a max-overclocked PlayStation 4 controller (2.89ms).
Click here for Average Latency Comparison by Controller.
The JDM-5X also reaches that 8KHz polling rate without having to install separate overclock drivers like hidusbf. With this board in your hands, you'll never have to doubt whether or not your controller is keeping up with you.
What are the differences between the MIDAS HE 5-pin thumbstick mechs and the two 3-pin options (Magneto TMR and Alps OEM)? Which one is better?
What are the differences between the MIDAS HE 5-pin thumbstick mechs and the two 3-pin options (Magneto TMR and Alps OEM)? Which one is better?
Alps OEM thumbstick mechs are the standard mechs used on PlayStation controllers. They'll act and feel just like a stock controller, because they're stock parts. However, due to how carbon-track potentiometers work, they will almost always develop stick drift over time.
This is an unavoidable limitation of the physical hardware. If you're okay with that risk, nothing will perform or feel more like the controllers you're used to than OEM thumbstick mechs.
If you want to avoid thumbstick drift for as long as possible, though, MIDAS HE 5-pin and Magneto TMR 3-pin both fulfill that role.
They both have upgraded sensors that use magnets to generate thumbstick input values instead of a carbon track that wears down over time. Both offer superior performance compared to OEM, and both are highly drift-resistant.
Where they differ is in the technology:
MIDAS HE 5-pin
MIDAS Mechs use an array of Hall Effect magnetic sensors combined with two extra pins for signal validation, so they're capturing more reliable data from more areas of the magnetic field as the thumbsticks move. Hall Effect technology is older than TMR, but the sensor array setup is fundamentally different than most Hall Effect mechs, which usually only use a single sensor.
Magneto TMR 3-pin
Magneto Mechs use TMR (Tunnel Magnetoresistance) sensors, the highest-precision magnetic single-sensor technology available in a controller. They lack the extra validation pins and sensor array of the MIDAS mechs, but precision is still high and drift is still rare. Common feedback is that they feel closer to OEM handling.
So are MIDAS mechs or Magneto mechs the better magnetic sensor option?
This will fundamentally come down to personal taste. Both magnetic sensors are extremely accurate and highly drift-resistant. TMR is generally better technology than Hall Effect, but the MIDAS Mechs have the extra sensors and pins for a cleaner and more complete signal. Magneto Mechs, on the other hand, can feel closer to an OEM controller, and they perform at a similar level for a lower cost.
Either choice is excellent.
Will the controller come ready to plug and play?
Will the controller come ready to plug and play?
Yes, your controller is ready to go out of the box, set up and calibrated in-house by our technicians before shipping.
Note: We calibrate every controller to match our optimal settings, but those settings may not match your preferences. Customize at https://setup.mariusheier.com.
How does Battle Beaver configure the controllers?
How does Battle Beaver configure the controllers?
Stick Configuration
Inner Deadzone: 2%
Outer Deadzone: 5%
Raising the Outer Deadzone helps push the Circularity Error Rate to a range closer to OEM, reducing the likelihood of sluggish diagonals. We also fine-tune the thumbstick values in Advanced mode to make sure each cardinal direction (up, down, left, right) easily reaches a maximum value. Exact fine-tune numbers vary.
Trigger Configuration
Mode: Analog for all trigger types. (See "Should I choose Analog or Digital for
triggers?" for more explanation.)
Rest: When triggers are at rest, we make sure the Raw value under the trigger meter is slightly higher than the Rest value. Exact numbers vary.
Press: This value controls how early or late the triggers reach their maximum value. Exact numbers vary.
Hair Trigger: 100% - This slider doesn't behave as expected, so we set it to 100% to effectively disable it.
LED Control
Color: #0099FF for Battle Beaver blue.
External Input Mapping
Button assignments vary depending on customer selection. Our most common layout is Left - X (cross), Right - O (circle).
Polling Rate
Slider: 8KHz.
My board should be running at 8KHz, but it isn't. What can I do?
My board should be running at 8KHz, but it isn't. What can I do?
First, check these common factors:
- The setup configuration: make sure the polling rate slider didn't reset itself to a
lower value, then re-save the calibration and check again. - Your cable specs: USB-A to USB-C, USB 3.0+ for best performance.
- The USB port you're using: connect to the motherboard directly, not through a USB hub or to a front panel USB header.
If those aren't the issue, join Marius's Discord server at https://discord.com/invite/QcCkfbkp3S and ask for help there. Include as much detail as you can.
Note: to check the polling rate of your JDM-5X board more reliably, use the DEEPPOLL tool found at https://tools.mariusheier.com.
I’m suddenly having performance issues, stuttering, jittery aim, etc. on my PC. What’s wrong?
I’m suddenly having performance issues, stuttering, jittery aim, etc. on my PC. What’s wrong?
8KHz polling rate may be too much for your system (or the game you’re playing) to handle. Older CPUs, some motherboards, or certain USB ports can get overloaded by the higher polling rate.
If you don’t want to drop to a lower polling rate, try the easy options first: different cable, different USB port, different game. After that, use Marius’s CPU Direct tool to make sure you’re connected to a CPU-direct USB port.
If the issue continues, drop the polling rate to 4KHz and check again. If that isn’t it, drop to 2KHz and check again. And if that isn’t it, the most effective next step is contacting Marius via his Discord for deeper hardware troubleshooting: https://discord.com/invite/QcCkfbkp3S.
Note: Battle Beaver is unable to assist with individual motherboard-level connection issues or JDM-5X hardware issues beyond the basics.
What’s the point if I can’t have it at 8KHz?
What’s the point if I can’t have it at 8KHz?
We’re currently building an XLAT latency measuring tool from Finalmouse to provide our own robust testing numbers. However, early community testing has shown that even all the way down at 1KHz, the JDM-5X can perform faster than 8KHz OC’d DualSense/DSE controllers.
As Marius himself puts it, asking the pizza guy, “Is it done yet?” more often is less important than making sure the pizza is cooked faster.
Can I have the hidusbf software running? Can I use that software on a JDM-5X controller?
Can I have the hidusbf software running? Can I use that software on a JDM-5X controller?
Yes, the software can be running without causing an issue. However, using it to try to
overclock one of these boards will cause performance to degrade. Instead, make sure no overclocks are applied to the JDM-5X board or the USB port it's plugged into, then use Marius's Setup page to apply the 8KHz polling rate.
Do I need to use DS4-Windows or a similar program to use this controller on PC?
Do I need to use DS4-Windows or a similar program to use this controller on PC?
No. These boards share the PlayStation 4 form factor, but they are not a PS4 board
replacement. The JDM-5X has no console compatibility and is PC-only. Because of
this, it's plug and play on PC — no extra software required.
Should I choose Analog or Digital for triggers?
Should I choose Analog or Digital for triggers?
For all Battle Beaver JDM-5X controllers: calibrate the triggers as Analog, regardless of whether you ordered stock or Smart Triggers. During initial setup, do not click the SKIP THIS STEP button.
Smart Triggers initial setup: follow the on-screen instructions as closely as you’re able to. Since there’s no way to actually slow press a Smart Trigger, however, getting the counter to go down during that step will require some experimentation with the timing.
If you did accidentally select SKIP THIS STEP during initial setup, don't worry:
repeating the Setup or Calibration process will allow you to fix it.
In the Trigger Configuration section in the Settings Menu, make sure the triggers are set to Analog.
The reason: Selecting Digital tells the controller to look for triggers on the Eagle Board. We wire Smart Bumpers and Triggers to a separate chip.
Note: this information may change with a future board revision or software update, and it may not match if you purchased your controller from a different company.
Last updated: February 27, 2026.
Can I swap from a 3-pin to a 5-pin thumbstick mech, or vice versa? How much would it cost?
Can I swap from a 3-pin to a 5-pin thumbstick mech, or vice versa? How much would it cost?
3-pin and 5-pin thumbstick mechs and boards are not cross-compatible. The boards themselves are different where the mechs connect.
Swapping from 3-pin to 5-pin requires purchasing a new board of the correct variant. To purchase one from Battle Beaver, you have three options:
- Build your own: https://battlebeavercustoms.com/pages/ps4-marius-builder
- Send your existing controller in for an upgrade: https://
battlebeavercustoms.com/pages/ps4-send-in-upgrade - Purchase a DIY Kit to upgrade at home: https://battlebeavercustoms.com/
collections/marius-board-kits
Costs vary depending on which option you choose. Base cost is $150 for a 5-pin board, and $120 for a 3-pin board, not including installation or other modification costs.
(Pricing info is current as of February 27, 2026, and is subject to change.)
What TMR sensor does Battle Beaver use in Magneto Mechs?
What TMR sensor does Battle Beaver use in Magneto Mechs?
AKNES V5/V6 TMR sensors, retrofit onto an OEM Alps frame for a drift-resistant upgrade that keeps the familiar OEM feeling under your thumbs.
Note: this information will change over time if/when AKNES releases new versions and
we receive new stock.
Last updated: February 27, 2026.
How can I verify my polling rate?
How can I verify my polling rate?
Use the DEEPPOLL tool located at https://tools.mariusheier.com.
Note: this tool does not measure input latency itself, only polling rate.
For DEEPPOLL support, join Marius's Discord server at https://discord.com/invite/QcCkfbkp3S.